Building a gaming PC can seem like an expensive hobby, but with careful planning and smart decisions, it’s possible to create a powerful system without draining your bank account. Whether you’re a casual gamer or someone just getting started in the world of PC building, this guide will show you how to assemble a budget-friendly gaming PC that still delivers excellent performance.
Why Build Your Own Gaming PC?
Before diving into the build process, it’s important to understand the benefits of building your own system:
- Cost efficiency – No markup for pre-built systems.
- Customizability – Tailor components to your needs and preferences.
- Upgradability – Easy to swap parts later.
- Performance for price – Get more value by choosing only what matters.
Step 1: Define Your Budget
Before you even start browsing components, determine how much you can spend. Here are some example tiers:
- $500–$700 USD: Entry-level gaming at 1080p
- $700–$1,000 USD: Mid-range build with better graphics and CPU
- $1,000+ USD: High-end performance and future-proofing
In this article, we’ll focus on building a solid 1080p gaming PC for under $700.
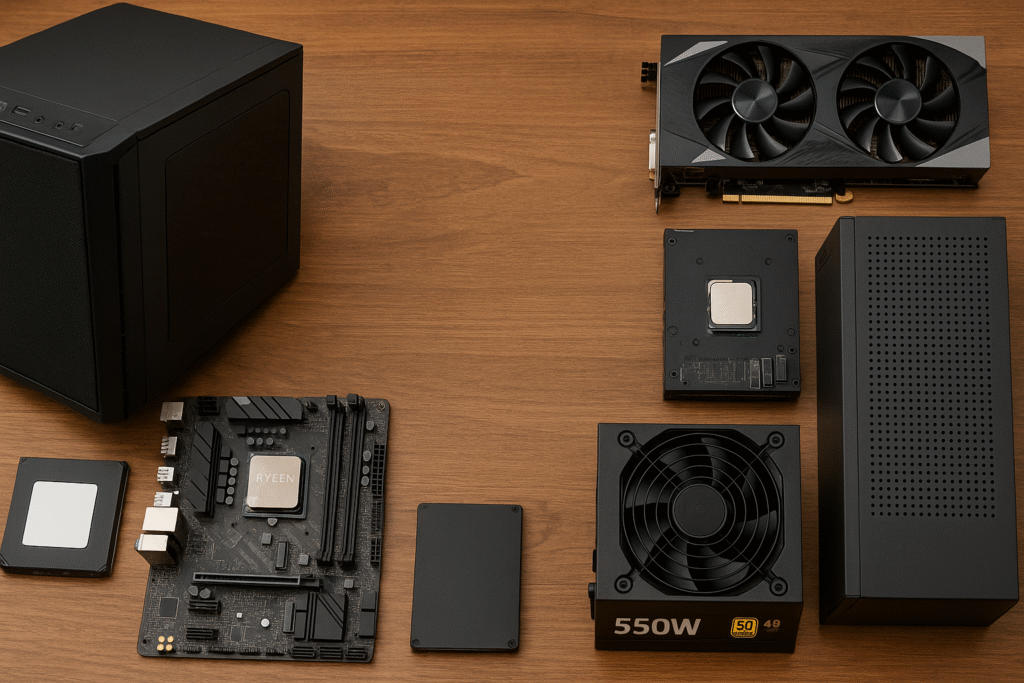
Step 2: Pick the Right Components
Here’s a breakdown of the essential components and where you can save without sacrificing too much performance.
1. CPU (Processor)
A capable CPU is important, but you don’t need the latest flagship. For budget builds:
- AMD Ryzen 5 5600G – Offers great integrated graphics if you can’t afford a GPU initially.
- Intel Core i3-12100F – Excellent performance for its price.
Tip: Avoid older CPUs that lack modern features and efficiency.
2. GPU (Graphics Card)
The GPU is the heart of any gaming PC. For budget options:
- AMD Radeon RX 6600
- NVIDIA GeForce GTX 1660 Super
- Intel Arc A750 (a newer player in budget gaming)
Tip: Look for used GPUs on reliable marketplaces. Many gamers upgrade often, leaving behind solid mid-tier cards.
3. Motherboard
Choose a motherboard compatible with your CPU. Options include:
- B550 Motherboard (for Ryzen CPUs)
- H610 or B660 (for Intel 12th Gen CPUs)
Budget models can cost between $70–$100.
4. RAM (Memory)
For modern gaming, 16GB DDR4 RAM (2x8GB) is the sweet spot.
- Stick with at least 3200 MHz for AMD and 2666 MHz or higher for Intel.
- Look for reliable brands like Corsair, Crucial, or G.Skill.
5. Storage
Avoid hard drives unless it’s for extra storage. Go with:
- 250–500GB NVMe SSD (for fast loading and boot times)
If you need more space, add a 1TB SATA SSD later.
6. Power Supply Unit (PSU)
Don’t cheap out on the PSU — it powers your entire system.
- 500W–600W from a reputable brand (Corsair, EVGA, Seasonic)
- Look for 80 Plus Bronze or better certification
7. Case
Cases are largely about aesthetics and airflow. Good budget options:
- NZXT H510
- Cooler Master MasterBox Q300L
- Phanteks Eclipse P360A
Just make sure the case supports your motherboard size (ATX, Micro-ATX).
Step 3: Buy Components Smartly
Where to Shop:
- Amazon – Great selection and customer support
- Newegg – Reliable for tech components
- Micro Center – Fantastic in-store deals (USA)
- eBay / Facebook Marketplace – Good for used parts
Warning: Always research sellers and avoid “too good to be true” deals.
Step 4: Assemble the PC
If this is your first build, don’t worry — it’s easier than it looks. Here’s a simple process:
Tools:
- Phillips screwdriver
- Anti-static wrist strap (optional but recommended)
Assembly Overview:
- Install CPU into the motherboard socket.
- Install RAM and M.2 SSD on the motherboard.
- Place motherboard into the case and screw it in.
- Mount power supply and connect cables.
- Install GPU (if using one).
- Connect all power and data cables.
- Power on and enter BIOS to check everything.
- Install Windows or Linux and drivers.
There are hundreds of YouTube tutorials for your exact component combination. Watching one can walk you through each step with visuals.
Step 5: Optimize for Gaming
After installing the operating system:
- Update your GPU drivers (NVIDIA, AMD, or Intel websites)
- Install a game launcher like Steam or Epic Games Store
- Use tools like MSI Afterburner to monitor performance
- Enable XMP in BIOS to unlock RAM’s full speed
Example Build Under $700 (Prices may vary)
| Component | Model | Approx. Price |
|---|---|---|
| CPU | AMD Ryzen 5 5600G | $120 |
| Motherboard | MSI B550M Pro | $90 |
| RAM | 16GB DDR4 3200MHz | $45 |
| Storage | 500GB NVMe SSD | $35 |
| GPU | AMD RX 6600 (used/new deal) | $200 |
| PSU | Corsair CV550 80+ Bronze | $45 |
| Case | Cooler Master MasterBox Q300L | $50 |
| Total | ~$585 |
This leaves room in your budget for peripherals, games, or upgrades later.
Upgrade Paths in the Future
- Add a dedicated GPU if starting with integrated graphics
- Increase to 32GB RAM for multitasking or creative work
- Add extra SSDs or an HDD for more storage
- Upgrade to a higher wattage modular PSU
- Swap the CPU for a newer-gen chip on the same socket
Final Thoughts: Game More, Spend Less
Building a budget gaming PC is more than possible in 2025 — it’s an exciting and rewarding process. With prices becoming more reasonable and technology advancing rapidly, even low-cost components can deliver solid gaming performance.
Remember: you don’t need a $2,000 machine to enjoy your favorite games. With the right choices, a well-planned $600–$700 build can handle most modern titles in 1080p at high settings.
So roll up your sleeves, do your research, and start building — your dream gaming setup is just a few clicks away.